
As inventory volume expands, knowing that an item is simply inside “the warehouse” is no longer enough. Warehouse staff waste hours wandering aisles searching for parts, staging areas become cluttered, and physical inventory counts turn into multi-day shutdowns.
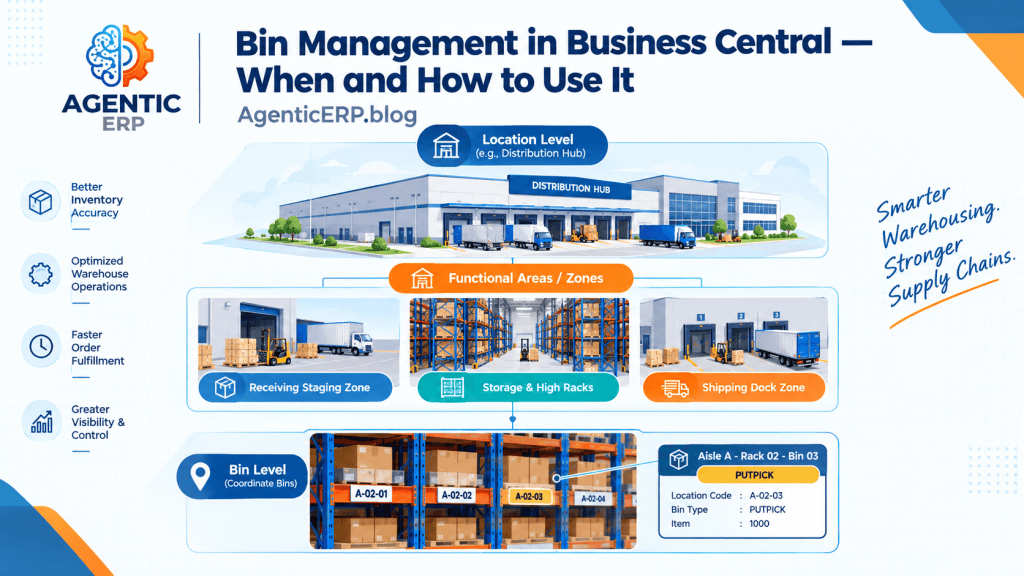
In Microsoft Dynamics 365 Business Central, Bin Management bridges the gap between basic inventory accounting and advanced warehouse execution. It allows you to partition a Location into granular physical compartments aisles, racks, shelves, and floor bins.
However, implementing bins is not a one-size-fits-all decision. Turn on too little, and you lose floor visibility; turn on too much, and warehouse workers get buried in unnecessary system clicks.
In this guide, we break down when to use bins, how to configure bin hierarchies, and how to choose the right operational complexity level in Business Central.
1. When Should You Use Bins?
Before configuring bins on a Location card, evaluate whether your operation actually demands bin tracking.
When Bins Are Essential:
- Large Footprint / High SKU Count: Warehouses where items cannot be found at a glance without an exact coordinate.
- Mixed-Item Storage: When multiple different items share the same physical shelving or staging areas.
- FIFO / Expiry Management: When perishable or batch-tracked goods must be picked strictly from specific forward-pick locations.
- Fast-Paced Order Fulfillment: When pickers need optimized walking paths across aisles to meet strict shipping SLAs.
When to Skip Bins:
- Small Retail Backrooms: Small footprints where the team already knows where every item sits.
- Bulk Single-Item Storage: Tank yards, outdoor lumber piles, or gravel silos where coordinates add zero operational value.
- Lean, One-Person Depots: Where the overhead of scanning or entering bin codes slows down daily receipt and dispatch.
2. The Bin Hierarchy: Zones, Bins, and Types
Business Central structures warehouse space hierarchically to mirror real-world facility layouts:
[ LOCATION: MAIN DISTRIBUTION HUB ]
│
├── [ ZONE: RECEIVING ] ──> Bin: REC-01 (Type: RECEIVE)
│
├── [ ZONE: STORAGE ] ──> Bin: A-01-01 (Type: PUTAWAY / STORAGE)
│ ──> Bin: A-01-02 (Type: PUTAWAY / STORAGE)
│
├── [ ZONE: PICKING ] ──> Bin: PICK-FAST-01 (Type: PICK)
│
└── [ ZONE: SHIPPING ] ──> Bin: SHIP-DOCK (Type: SHIP)
Key Elements of the Setup:
- Zones: Higher-level functional areas inside the warehouse (e.g., Cold Storage, Hazmat, High-Rack Bulk, Staging).
- Bin Code: The unique alphanumeric coordinate (e.g.,
A-03-02representing Aisle A, Rack 3, Shelf 2). - Bin Types: Predefined tags that dictate what activities Business Central permits inside that bin:
- RECEIVE: Where incoming purchase orders or transfers are initially unloaded.
- SHIP: Where outbound orders are staged before loading onto trucks.
- PUTAWAY / PICK / PUTPICK: Active inventory storage used for daily material movements and order allocation.
3. The 3 Levels of Bin Complexity in Business Central
Business Central lets you control bin tracking complexity location-by-location on the Location Card:
Level 1: Basic “Bin Mandatory” (Zero Extra Paperwork)
- Configuration: Turn ON Bin Mandatory; leave Require Receive and Require Shipment OFF.
- How It Works: Every purchase receipt, sales shipment, and item journal requires a Bin Code directly on the transaction line.
- Best For: Small distributors or single-person operations that want bin traceability without creating separate warehouse documents (no warehouse receipts or pick tickets).
Level 2: Warehouse Receipts & Picks with Bins
- Configuration: Turn ON Bin Mandatory, Require Receive, and Require Shipment.
- How It Works: Purchasing and sales documents create warehouse instructions. Receipts land in a staging bin; shipping lines pick from storage bins.
- Best For: Mid-sized warehouses where floor staff focus solely on physical movements, separated from office personnel posting financial invoices.
Level 3: Advanced Directed Put-away and Pick (WMS)
- Configuration: Turn ON Directed Put-away and Pick (this automatically enforces bins, zones, and warehouse documents).
- How It Works: Business Central takes full control of inventory routing. The system uses bin rankings, maximum weight/cube capacities, and pick paths to instruct workers exactly where to place and retrieve items.
- Best For: High-volume 3PLs and enterprise distribution hubs with heavy forklift operations.
4. Setting Up Bins: Step-by-Step
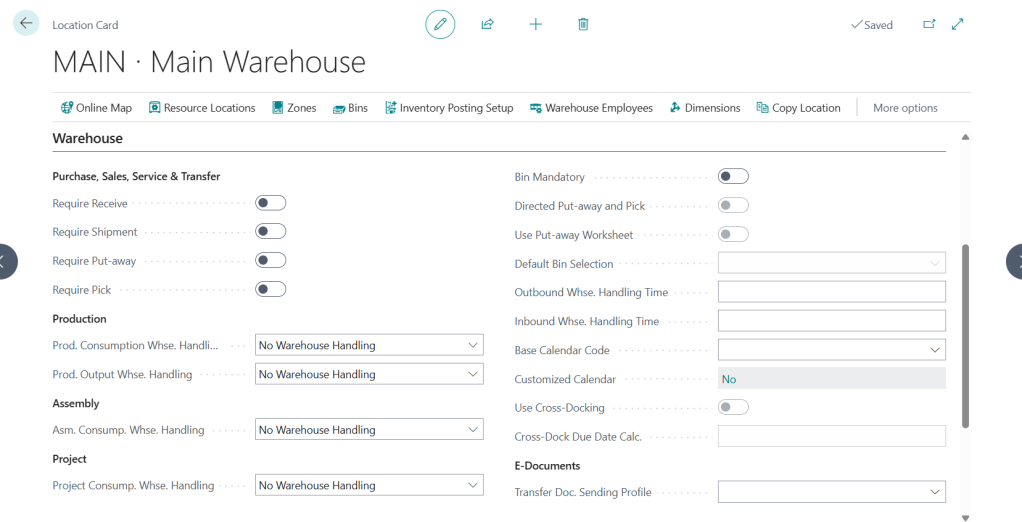
Step A: Enable Bin Mandatory on the Location
- Open Locations and choose your facility (e.g.,
EAST-WH). - Expand the Warehouse FastTab.
- Check the Bin Mandatory box.
Step B: Create Bins (Individually or via Bin Creation Worksheet)
- From the Location Card, click Related -> Location -> Bins.
- For small setups, manually define codes:
- Bin Code:
A01-R01-S01 - Description:
Aisle 1, Rack 1, Shelf 1 - Bin Type Code:
PUTPICK
- Bin Code:
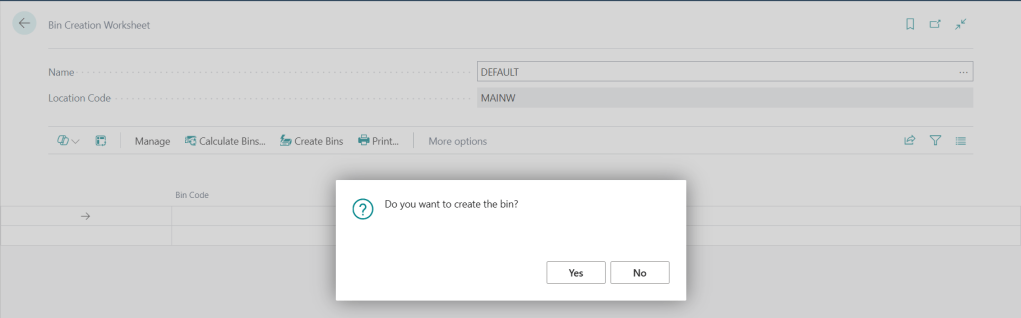
- For large facilities, use the Bin Creation Worksheet to batch-generate hundreds of coordinates across aisle, rack, and shelf templates in seconds.
Step C: Assign Default Bins per Item
To eliminate manual data entry for pickers:
- Open the Item Card or Bin Contents page.
- Designate a Default Bin for each item. When creating a purchase receipt or sales order, Business Central automatically suggests this bin code.
5. Moving Stock Between Bins (Internal Housekeeping)
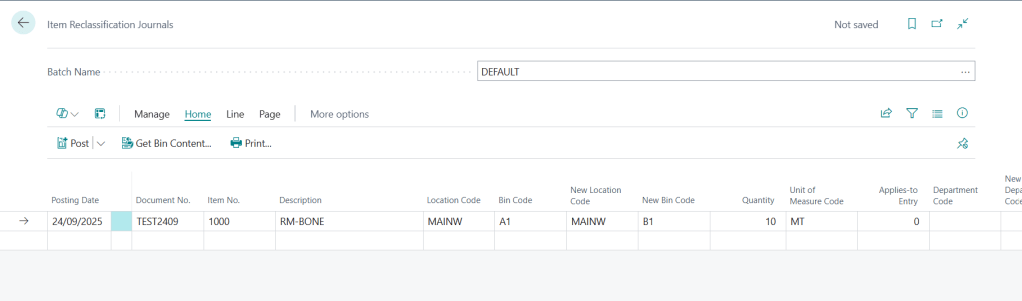
When warehouse workers need to reorganize shelves, replenish a low forward-pick bin from a high-rack bulk area, or consolidate open space, do not use an Item Journal.
- Use the Item Reclassification Journal:Enter the Item No., Location Code, New Bin Code, and Quantity.
- Posting Impact: This changes the physical coordinate in the Warehouse Entry table without touching the General Ledger or altering the overall quantity on hand.
Common Pitfalls & How to Avoid Them
| Mistake / Trap | Operational Consequence | Recommended Fix |
| Turning on Directed Put-away too early | System blocks everyday receipts because bin capacities, dimensions, or zones are missing. | Start with simple Bin Mandatory; only upgrade to Directed Put-away when volumetric data is clean. |
| Using Item Journals for bin moves | Postings create unnecessary financial ledger entries and valuation adjustments. | Use Item Reclassification Journals for pure bin-to-bin movements. |
| No Default Bins assigned | Users must manually type or look up bin codes on every single document line. | Map default bins via Bin Contents during item onboarding. |
Looking Ahead: The Agentic ERP Horizon 🤖
Bin assignment and space utilization often rely on static rules that fail to account for shifting seasonal demand.
In an Agentic ERP architecture:
- Autonomous Slotting Optimization Agent: An AI agent analyzes order lines over the past 30 days. When an item becomes a fast-moving product, the agent automatically creates an Item Reclassification Journal to move the item from high-rack bulk storage to lower, forward-pick bins closer to the shipping dock, cutting pick travel time.
- Warehouse Capacity & Congestion Agent: An agent monitors inbound receipts against bin volume limits. If a delivery will overload an assigned aisle, it autonomously reassigns arrival lines to adjacent open bins and updates mobile scanning devices in real time.
Summary
Bin Management in Business Central turns warehouse guesswork into precision. By matching your operational footprint to the right complexity tier starting with simple Bin Mandatory and scaling up as processes mature you secure granular stock visibility, speed up picking, and establish warehouse discipline without burdening your team.

